Understand the self-test diagnostic page
Use the self-test diagnostic page to:
•
View current device information, ink cartridge status, and printhead health status
•
Help troubleshoot problems
•
Verify installation of optional accessories, such as the duplexer
The self-test diagnostic page also contains a log of recent events.
Chapter 9
96
Configure and manage
If you need to call HP, it is often useful to print the self-test diagnostic page before
calling.
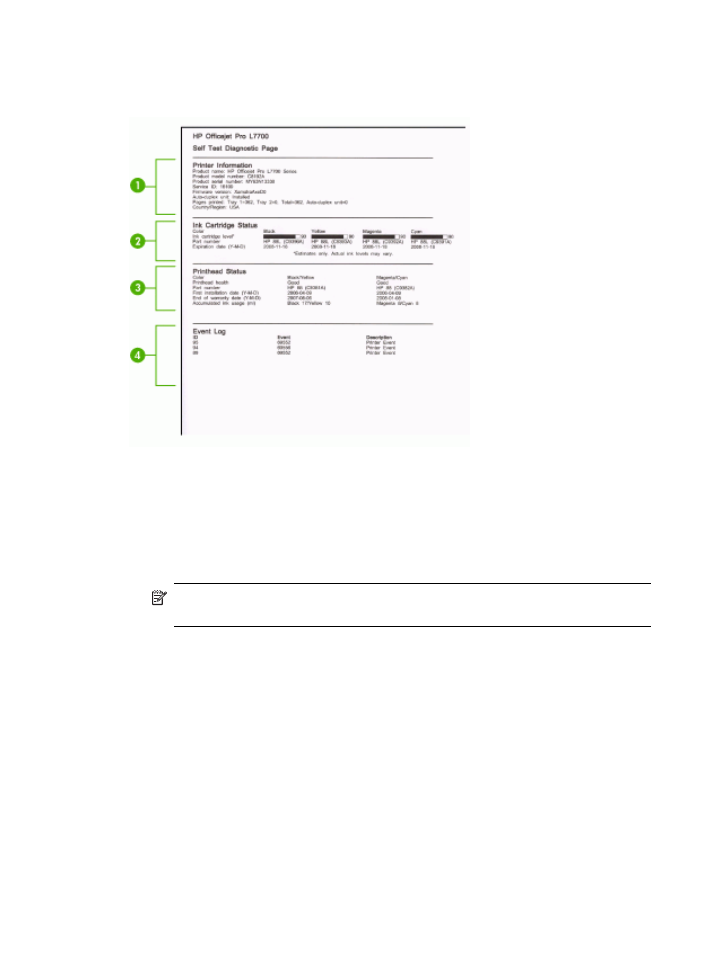
1. Printer Information: Shows device information (such as the product name, model
number, serial number, and firmware version number), the accessories that are
installed (such as the duplexer), and the number of pages printed from the trays
and accessories.
2. Ink Cartridge Status: Shows the estimated ink levels (represented in graphical
form as gauges) and the part numbers and expiration dates of the ink cartridges.
NOTE:
The ink levels shown are an estimate only. Actual ink volumes may
vary.
3. Printhead Status: Shows the status of the printhead health and the part numbers,
first-installation dates, and end-of-warranty dates of the printheads, as well as the
accumulated ink usage. The status options for the printhead are: good, fair, and
replace. If the status is 'fair,' then the print quality must be monitored, but the
printhead does not need to replaced. If the status is 'replace,' then the printhead
should be replaced, as the device will not function until it is.
4. Event Log: Shows a log of recent events that have occurred.
To print the Self-Test Diagnostic Page
•
Control panel: Press Setup, select Print Report, select Self-Test Report, and
then press OK.
•
Toolbox (Windows): Click the Services tab, and then click Print Self-test
Diagnostic Page.
•
HP Printer Utility (Mac OS): Click Device Information from the Information and
Support panel, and then click Print Configuration Page.
Understand the self-test diagnostic page
97